Mastering Provisional Crowns For NDECC & ADC Practical: A Comprehensive Guide for Dental Simulations
- Rahul Monga

- Oct 15, 2023
- 5 min read
Updated: May 11, 2024
Provisional crown fabrication is a critical skill that international dentists often need to master to pass exams like the NDECC or the Australian Dental Council practical exam. Think of it as the dress rehearsal before the grand performance. This process involves creating temporary crowns on typodonts, a task that’s considered challenging. In this blog, we’ll delve into various problems encountered during provisional crown fabrication and discuss effective ways to overcome them.

let's dive deeper into each problem encountered during provisional crown fabrication and their solutions:
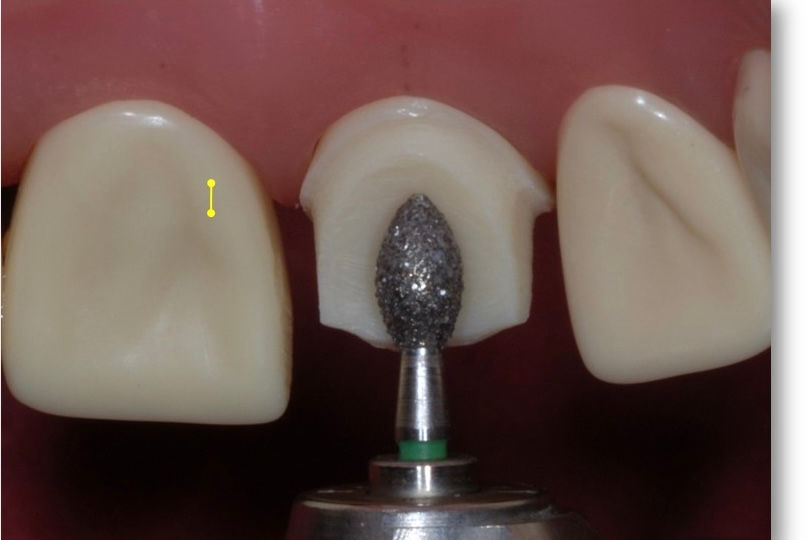
1. Problem: Insufficient Reduction
Inadequate tooth reduction is a common stumbling block in provisional crown fabrication. This is going to be challenging if you are fabricating a crown, on the tooth you earlier prepared for PFM or Zirconia. Think of it as trying to build a house without a proper foundation; the results won't hold up. The provisional crown needs adequate space for a proper fit. To tackle this, you'll want to use depth-cutting burs, shoulder burs or chamfer burs ( depends upon type of restoration).
Depth-cutting burs help create the necessary depth for the crown to seat correctly, while shoulder burs ensure the appropriate convergence angle.
Consider using a gradual approach when reducing tooth structure. You can start with a depth-cutting bur to establish the depth and then switch to shoulder burs for precise contouring. Regularly measure and evaluate the reduction progress with a periodontal probe to avoid overreduction.
Furthermore, it's essential to be patient and meticulous. The ideal reduction will not happen in a single pass. Regular checks and adjustments will be your best allies in ensuring that the provisional crown fits like a glove, setting the stage for a successful restoration.
2. Problem: Inadequate Moisture Control
Picture this: you're trying to paint a masterpiece on a canvas, but the canvas is wet. Inadequate moisture control during provisional crown fabrication can lead to a compromised result. Just like a painter needs a dry canvas, a dentist needs a dry field for precision.
The provisional crown material should always be free from moisture. Saliva ejectors and pressurized air from air-water syringe work hand in hand, effectively removing any unwanted fluids from the working area.
Proper isolation not only keeps the field dry but also prevents contamination. It ensures the provisional crown is stain and debris free. It's akin to having a clean canvas to create your dental masterpiece.
Remember that meticulous isolation is the foundation of success in provisional crown fabrication. Take your time and master the use of these instruments. A dry, controlled environment is essential for a flawless provisional crown.
3. Problem: Poor Marginal Adaptation
Marginal adaptation is like the borders of a puzzle; if they don't fit perfectly, the final picture won't be complete. In the case of provisional crown fabrication, poor marginal adaptation can lead to leakage, discomfort, and other issues.
To overcome this problem, start by selecting high-quality provisional crown materials with good flow properties. You don't have a choice if materials are provided by the dental board. This ensures that the material reaches every nook and cranny for a snug fit. Then, use thin blades or a margin trimmer to achieve precise trimming and contouring.
These tools are your paintbrushes, allowing you to sculpt the crown to perfection. Try to get used to the provisional crown material as provided by NDEB , Australian Dental Council, or any other dental board you are challenging the exam for.
In addition to the instruments, dental loupes or microscopes are your magnifying glasses, enabling you to see the details up close. These tools help identify any imperfections in the marginal adaptation that may not be visible to the naked eye.
Achieving excellent marginal adaptation is the key to a successful provisional crown. Like a puzzle with perfect borders, it ensures that the final restoration fits seamlessly and functions as intended.

4. Problem: Incorrect Occlusion
Misaligned occlusion in a provisional crown is like driving a car with misaligned wheels. It can lead to discomfort, improper function, and even damage to the restoration or adjacent teeth. To ensure a correct bite, utilize articulating paper and follow these steps:
1. Place a thin sheet of articulating paper between the upper and lower teeth of the typodont.
2. Have the typodont close down, marking the high points of occlusion.
3. Analyze the marks to identify any premature contacts or interference.
4. Adjust the provisional crown accordingly by selectively removing material from the high spots.
This step-by-step approach is your roadmap to a harmonious occlusion. Think of the articulating paper as your diagnostic tool, revealing the landscape of occlusal contacts. Adjusting the provisional crown to achieve a balanced and stable occlusion is akin to aligning the wheels of a car, ensuring a smooth ride.
When it comes to adjustments, use occlusal adjustment instruments like diamond burs and polishing discs with care and precision. Regularly check the occlusion and make necessary modifications until you achieve the desired results.
5. Problem: Fractured Crowns
A fractured provisional crown is akin to a cracked windshield; it needs immediate attention. The choice of materials and careful handling are key to preventing crown fractures.
Selecting resilient provisional crown materials is like choosing durable glass for your windshield. These materials should be strong enough to withstand the forces of mastication and daily wear. Popular choices include acrylic-based or resin-based provisional crown materials. They offer a balance of strength and ease of use.
When it comes to handling provisional crown in the typodont, gentleness is the golden rule. Excessive force can lead to stress and fractures. Take your time and follow a gradual approach when seating the crown. If you encounter resistance, don't force it; instead, examine the underlying cause, which could be presence of excess interproximally or other issues, and address them first.
If a fracture does occur, consider repairing it using a flowable composite or opt for a replacement, depending on the extent of the damage. Remember that the provisional crown is like your car's windshield; a well-maintained one ensures a clear and safe journey.
6. Problem: Removing Provisional Crown When the Material Has Fully Cured or Partially Cured
Imagine trying to unstick a label that's adhered firmly to a package. When dealing with provisional crowns that have fully cured or partially cured, it can feel just as challenging. Removal becomes a delicate process, and the wrong approach can lead to damage.
- Fully Cured Material: If the provisional crown material has fully cured, it may become hard as stone. Attempting to remove it forcefully can risk damaging the underlying tooth or even the assessment tooth itself. To resolve this issue, begin by assessing the material's bond strength. If it's securely adhered, consider using a probe, which is designed to lift the provisional material without harming the tooth. Employ a slow, controlled approach, working your way around the crown carefully. This process is like chiseling away at a sculpture; precision is essential.
- Partially Cured Material: When dealing with partially cured material, it's like trying to pull apart two pieces of Velcro that have just begun to stick. It's challenging but manageable. You can use a combination of dental floss and probe. Gently slide the dental floss between the tooth and the provisional crown, working it back and forth to separate the two. Once you've created enough space, use probe to carefully lift the provisional crown off the tooth.
Always exercise caution, as using excessive force can lead to complications. Patience and a methodical approach are your best allies in successfully removing fully or partially cured provisional crowns.
Conclusion:
Provisional crown fabrication is a meticulous process that requires skill, precision, and the right tools. Insufficient reduction, inadequate moisture control, poor marginal adaptation, incorrect occlusion, and fractured crowns are common hurdles. By mastering the techniques and tools discussed in this blog, you'll be better prepared for the NDECC and ADC practical exams, ensuring that your provisional crowns are top-notch, just like the finishing touch on a masterpiece.
Provisional crown fabrication, when executed with care and attention to detail, paves the way for successful dental restorations. Keep practicing and perfecting these skills, and you'll be well on your way to a successful dental career in Canada or Australia.


Comments